Definitely there is an issue running Windows 2008 R2 Service Pack 1 (SP1) VM on ESX 3.5.
We have several VMs running SQL Server, IIS, SharePoint and Project Servers. After lot of timeout issues, I decided to spend a couple of hours to research where the issue is.
I saw the VM is using almost all memory and only 25MB of free memory is available.
I started disabling all services (IIS, SharePoint, SQL, Antivirus) and rebooted server. Server still using around 3.8 GB of RAM of 4GB.
Rebooted on safe mode, using 380 MB! Rebooted on safe mode with networking around 460 MB!
Then I compared with others servers (1 VM and 1 physical server). Same issue on the VM, but physical server was using around 800MB of RAM.
I decided to uninstall VM Tools and viola! Issue resolved.
Showing posts with label VMware. Show all posts
Showing posts with label VMware. Show all posts
Thursday, November 03, 2011

Thursday, November 11, 2010
VMware: VMUpgradeHelper service was unable to get the list of network adaptars for this computer
Error: The service was unable to get the list of network adapters for this computer. This problem can occur when the Windows Management Instrumentation service is not started. Please check that the Windows Management Instrumentation service has been started on this computer.
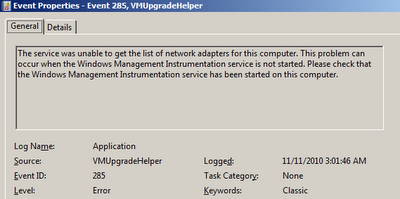 Solution: This issue is caused by WMI on server. Verify WMI service is running. Rebuild the WMI using following article http://musumeci.blogspot.com/2010/11/ms-windows-management-instrumentation.html
 Solution: This issue is caused by WMI on server. Verify WMI service is running. Rebuild the WMI using following article http://musumeci.blogspot.com/2010/11/ms-windows-management-instrumentation.html
Thursday, November 04, 2010
VMware: Performance Best Practices for VMware vSphere 4.1
VMware has released this document regarding Performance Best Practices for VMware vSphere 4.1
http://www.vmware.com/pdf/Perf_Best_Practices_vSphere4.1.pdf
http://www.vmware.com/pdf/Perf_Best_Practices_vSphere4.1.pdf
Friday, September 17, 2010
VMware: Error The specified parameter was not correct: "." on VMware Converter
When you try to P2V a Windows 2008 R2 or Windows 7 x64 using VMware Converter 4.3 you receive following error: The specified parameter was not correct: "."

Solution: right click on VMware Converter icon on the desktop and choose Run as administrator
Note to VMware: UAC is around since Windows 2008 and Windows Vista (probably +3 years), will be nice if your development team learn about it!!!!!
Wednesday, September 15, 2010
VMware: How to Install VMware ESX 3.5 or VMware ESXi v3.5 on VMware Workstation 7.x
Detailed instructions to Install VMware ESX 3.5 or VMware ESXi v3.5 on VMware Workstation 7.x available as a PDF at:
http://technotes.musumeci.com.ar/How_to_Install_VMware_ESX_3.5_on_VMware_Workstation_7.pdf
http://technotes.musumeci.com.ar/How_to_Install_VMware_ESX_3.5_on_VMware_Workstation_7.pdf
Wednesday, September 08, 2010
VMware: Turn vCPU’s into vCores
The procedure below will "convert" vCPUs into vCores
Example: we have software product licensed for 2 CPUs. We add 4 vCPU to VMWare VM.
Using the procedure below, we can convert these 4 CPU as 2CPU of 2 Cores each.
1.Power off the VM
2.Right click on the VM and select “Edit Settings…”
3.Select the “Options” tab
4.Click on “General” (in the “Advanced” options section)
5.Click “Configuration Parameters…” (in the pane on the right)
6.Click “Add Row”
7.Enter “cpuid.coresPerSocket” in the “Name” column
8.Enter a value, like 2 or 4 in the “Value” column
9.Click “OK”
10.Power on the VM
Based on a post from Duncan at YellowBrick
Example: we have software product licensed for 2 CPUs. We add 4 vCPU to VMWare VM.
Using the procedure below, we can convert these 4 CPU as 2CPU of 2 Cores each.
1.Power off the VM
2.Right click on the VM and select “Edit Settings…”
3.Select the “Options” tab
4.Click on “General” (in the “Advanced” options section)
5.Click “Configuration Parameters…” (in the pane on the right)
6.Click “Add Row”
7.Enter “cpuid.coresPerSocket” in the “Name” column
8.Enter a value, like 2 or 4 in the “Value” column
9.Click “OK”
10.Power on the VM
Based on a post from Duncan at YellowBrick
Wednesday, September 01, 2010
VMware ESX and ESXi 4.1 Comparison
VMware ESX and ESXi 4.1 Comparison
http://www.vmware.com/products/vsphere/esxi-and-esx/index.html
http://www.vmware.com/products/vsphere/esxi-and-esx/compare.html#c177109
Upgrade from ESX to ESXi
http://www.vmware.com/products/vsphere/esxi-and-esx/upgrade.html#c177045
http://www.vmware.com/products/vsphere/esxi-and-esx/index.html
http://www.vmware.com/products/vsphere/esxi-and-esx/compare.html#c177109
Upgrade from ESX to ESXi
http://www.vmware.com/products/vsphere/esxi-and-esx/upgrade.html#c177045
Wednesday, May 19, 2010
Detect running inside a Virtual Machine
In December 2008, I wrote a tool to detect if we are running inside a Virtual Machine, this small application called DetectVM works fine for a several months until I received a few complains about it: not working on x64 systems and don't detect VMware ESX 4.0 vSphere.
Today I rewrite the whole application for scratch on Visual Studio.NET. The new version DetectVM 2.0 works on x86 and x64 systems and detect ESX 4.0 vSphere.
Detect VM 2.0 detect Virtual Machines running on Microsoft Virtual Server and Hyper-V, VMware and Citrix XenServer.
When you run DetectVM 2.0, the application return a code so we can run on silent mode (use /quiet or /q parameter) on a batch file.
Below is a script example:
---- Start Script ----
@ECHO OFF
DetectVM /QUIET
IF ERRORLEVEL 100 GOTO ErrorVM
IF ERRORLEVEL 3 GOTO Xen
IF ERRORLEVEL 2 GOTO VMware
IF ERRORLEVEL 1 GOTO Microsoft
REM No Virtual Machine
ECHO Not running inside a Virtual Machine
GOTO End
:Microsoft
REM Microsoft
ECHO Running Inside a Microsoft Virtual Machine
GOTO End
:VMware
REM VMware
ECHO Running Inside a VMware Virtual Machine
GOTO End
:Xen
REM Citrix XenServer
ECHO Running Inside a Citrix XenServer Virtual Machine
GOTO End
ErrorVM
ECHO Error Detecting Virtual Machine
:End
---- End Script ----
You can download DetectVM for FREE, the script and source code from http://ctxadmtools.musumeci.com.ar
Today I rewrite the whole application for scratch on Visual Studio.NET. The new version DetectVM 2.0 works on x86 and x64 systems and detect ESX 4.0 vSphere.
Detect VM 2.0 detect Virtual Machines running on Microsoft Virtual Server and Hyper-V, VMware and Citrix XenServer.
When you run DetectVM 2.0, the application return a code so we can run on silent mode (use /quiet or /q parameter) on a batch file.
Below is a script example:
---- Start Script ----
@ECHO OFF
DetectVM /QUIET
IF ERRORLEVEL 100 GOTO ErrorVM
IF ERRORLEVEL 3 GOTO Xen
IF ERRORLEVEL 2 GOTO VMware
IF ERRORLEVEL 1 GOTO Microsoft
REM No Virtual Machine
ECHO Not running inside a Virtual Machine
GOTO End
:Microsoft
REM Microsoft
ECHO Running Inside a Microsoft Virtual Machine
GOTO End
:VMware
REM VMware
ECHO Running Inside a VMware Virtual Machine
GOTO End
:Xen
REM Citrix XenServer
ECHO Running Inside a Citrix XenServer Virtual Machine
GOTO End
ErrorVM
ECHO Error Detecting Virtual Machine
:End
---- End Script ----
You can download DetectVM for FREE, the script and source code from http://ctxadmtools.musumeci.com.ar
Thursday, January 15, 2009
VMware: Install VMware Tools on Windows 2008 Core R2
To install VMware Tools on Windows 2008 Core R2 you need to follow this procedure:
Run Start /w ocsetup ServerCore-WOW64
Restart server
Install VMware Tools from VM menu.
Change to the CD/DVD drive
Run msiexec /i "VMware Tools64.msi" /passive

Run Start /w ocsetup ServerCore-WOW64
Restart server
Install VMware Tools from VM menu.
Change to the CD/DVD drive
Run msiexec /i "VMware Tools64.msi" /passive

Friday, December 26, 2008
CtxAdmTools: Clone XenApp VM v1.0 Updated
Clone XenApp VM v1.0 Updated (New Build 1.00.28 released December 26, 2008)
New Feature:
Update AU Client (WSUS): Update Registry Keys and re-register Automatic Update Client with WSUS.
http://ctxadmtools.musumeci.com.ar

This FREE tool clone Citrix XenApp (formerly Citrix Presentation Server) Virtual Machines
Deploy XenApp Virtual Machines in Virtualization Environments (VMware, XenServer, Hyper-V).
New Feature:
Update AU Client (WSUS): Update Registry Keys and re-register Automatic Update Client with WSUS.
http://ctxadmtools.musumeci.com.ar

Wednesday, November 12, 2008
VMWARE: Add Virtual Machine to Inventory in VMware Server 2.0
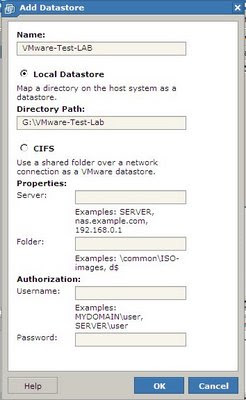
To Add Virtual Machine to Inventory first you must add the Datastore:
1) Add Datastore
Click Inventory --> Server Name
Click Summary --> Commands --> Add Datastore
Complete Name and select Local Datastore.
Enter the existing folder containing VMware Virtual Machines in Directory Path
2) Add Virtual Machine
Click in Virtual Machine menu --> Add Virtual Machine to Inventory
Select the VM and select OK.

1) Add Datastore
Click Inventory --> Server Name
Click Summary --> Commands --> Add Datastore
Complete Name and select Local Datastore.
Enter the existing folder containing VMware Virtual Machines in Directory Path
2) Add Virtual Machine
Click in Virtual Machine menu --> Add Virtual Machine to Inventory
Select the VM and select OK.

Wednesday, October 29, 2008
VMWARE: VMware Released VMware Server 2.0
VMware Released today the VMware Server 2.0 (Build 122956)
What's New
VMware Server 2.0 is a free virtualization product for Microsoft Windows and Linux servers that enables you to provision new server capacity by partitioning a physical server into multiple virtual machines.
New Key Features
VI Web Access: VI Web Access enables you to perform host and virtual machine configuration on VMware Server 2.0. This intuitive web-based interface provides a simple and flexible tool for virtual machine management.
VMware Remote Console: VMware Remote Console enables you to interact with the guest operating system on the host or a remote system. After you install it as a Web browser add-on, it can run independently from VI Web Access. VMware Remote Console also allows you to connect and disconnect client CD/DVD and floppy devices.
USB 2.0 Device Support: VMware Server now supports faster data transfer with USB devices plugged into the host system. If the guest operating system has appropriate USB 2.0 device drivers, you can use peripherals that require high-speed performance, such as speakers, webcams, next-generation printers and scanners, and fast storage devices.
Increased RAM support: The maximum amount of memory that can be allocated per virtual machine has been raised from 3.6GB to 8GB. The amount of memory used by all virtual machines combined is limited only by the amount of the host computer's RAM.
Improved 64-bit guest support: 64-bit guest operating systems that run on Intel EM64T VT-capable or AMD64 revision D or later processors are fully supported.
Native 64-bit host support on Linux: VMware Server now runs natively on 64-bit Linux host operating systems.
Quiesced backups of virtual machines: On Windows hosts, you can enable the VMware VSS Writer, which uses snapshots to maintain the data integrity of applications running inside the virtual machine when you take backups.
VMCI Sockets interface: This feature provides a sockets interface for the Virtual Machine Communication Interface, which provides a faster means of communication among applications running on the host and in virtual machines. For more information, see the VMCI Sockets Programming Guide.
Hot add and remove for SCSI hard disks: You can now add and remove SCSI virtual hard disks while the virtual machine is running in hardware version 7 virtual machines.
What's New
VMware Server 2.0 is a free virtualization product for Microsoft Windows and Linux servers that enables you to provision new server capacity by partitioning a physical server into multiple virtual machines.
New Key Features
VI Web Access: VI Web Access enables you to perform host and virtual machine configuration on VMware Server 2.0. This intuitive web-based interface provides a simple and flexible tool for virtual machine management.
VMware Remote Console: VMware Remote Console enables you to interact with the guest operating system on the host or a remote system. After you install it as a Web browser add-on, it can run independently from VI Web Access. VMware Remote Console also allows you to connect and disconnect client CD/DVD and floppy devices.
USB 2.0 Device Support: VMware Server now supports faster data transfer with USB devices plugged into the host system. If the guest operating system has appropriate USB 2.0 device drivers, you can use peripherals that require high-speed performance, such as speakers, webcams, next-generation printers and scanners, and fast storage devices.
Increased RAM support: The maximum amount of memory that can be allocated per virtual machine has been raised from 3.6GB to 8GB. The amount of memory used by all virtual machines combined is limited only by the amount of the host computer's RAM.
Improved 64-bit guest support: 64-bit guest operating systems that run on Intel EM64T VT-capable or AMD64 revision D or later processors are fully supported.
Native 64-bit host support on Linux: VMware Server now runs natively on 64-bit Linux host operating systems.
Quiesced backups of virtual machines: On Windows hosts, you can enable the VMware VSS Writer, which uses snapshots to maintain the data integrity of applications running inside the virtual machine when you take backups.
VMCI Sockets interface: This feature provides a sockets interface for the Virtual Machine Communication Interface, which provides a faster means of communication among applications running on the host and in virtual machines. For more information, see the VMCI Sockets Programming Guide.
Hot add and remove for SCSI hard disks: You can now add and remove SCSI virtual hard disks while the virtual machine is running in hardware version 7 virtual machines.
Friday, August 22, 2008
Monday, July 28, 2008
VMware: VMware released ESX 3i for free
VMware released the Update 2 for VMware Infrastructure 3.5 and that will give away the lightweight edition of the product, ESX 3i, for free.
VI 3.5 and ESX 3i will continue to share a the large majority of the code base.
ESX 3i will continue to have the same features that has today, without additional limitations
VMware will not require the purchase of any software & support subscription to access the product. Customer will be able to get the code without any restriction.
VMware ESXi has the same functionality and performance as VMware ESX but with a 32 MB disk footprint. With the ability to seamlessly upgrade to VMware Infrastructure 3, customers can add the benefits of server consolidation, automatic load balancing and business continuity to VMware ESXi.
Download VMware ESX 3i
VI 3.5 and ESX 3i will continue to share a the large majority of the code base.
ESX 3i will continue to have the same features that has today, without additional limitations
VMware will not require the purchase of any software & support subscription to access the product. Customer will be able to get the code without any restriction.
VMware ESXi has the same functionality and performance as VMware ESX but with a 32 MB disk footprint. With the ability to seamlessly upgrade to VMware Infrastructure 3, customers can add the benefits of server consolidation, automatic load balancing and business continuity to VMware ESXi.
Download VMware ESX 3i
Thursday, December 20, 2007
Monday, July 23, 2007
VMware: How to install Microsoft Windows 2008 Core on VMware Server
How to install Microsoft Windows 2008 Core (Beta 3) on VMware Server
This document explain how to install Windows 2008 Core (Beta 3) on VMware Server.
Contents:
This document explain how to install Windows 2008 Core (Beta 3) on VMware Server.
Contents:
- Create a Virtual Machine for Windows 2008 Core
- Install VMware Tools
- Set or change the administrative password
- Change the screen resolution
- Configure the network card (IP Address, DNS, WINS, Firewall)
- Rename the server
- Join the machine a domain / Workgroup
- Remove the server from the domain
- Restart the computer
- Remote Desktop
- Windows Update
- System Properties
- Configure Pagefile
- Hotfix Management
- Applications Management
- Drivers Management
- Activate the server
- Services and Process Management
Friday, July 20, 2007
VMware: Change the Screen Resolution on Windows 2008 Core (on VMware Server)
To change the screen resolution on a Windows 2008 Core you have two choices:
1) Run regedit.exe on another computer to remotely access the registry on the Server Core.
2) Change manually.
The registry key with the resolution information is:
HKEY_LOCAL_MACHINE\SYSTEM\CurrentControlSet\Control\Video
Under this key will be a list of GUIDs and you will need to determine which one corresponds to your video card/driver. Under the GUID, you can set:
\0000\DefaultSettings.XResolution
\0000\DefaultSettings.YResolution
For example: To change the resolution on a VMware Server, search for "Device Description"="VMware SVGA II"
To manually change resolution on a Windows 2008 Core server on the Command Prompt type:
reg export HKEY_LOCAL_MACHINE\SYSTEM\CurrentControlSet\Control\Video /s video.reg
Then you will need to edit the video.reg, change the resolution (The values are on Hex), remove the rest of info and save the file.
This an example from VMware Server machine at 800x600:
---- Start Video800.reg ----
Windows Registry Editor Version 5.00
[HKEY_LOCAL_MACHINE\SYSTEM\CurrentControlSet\Cofntrol\Video\{621060A6-5E79-471A-A468-DD745B2DD17C}\0000]"
DefaultSettings.XResolution"=dword:00000320
"DefaultSettings.YResolution"=dword:00000258
---- End Video800.reg ----
Finally at the command prompt type:
REG IMPORT Video800.reg
1) Run regedit.exe on another computer to remotely access the registry on the Server Core.
2) Change manually.
The registry key with the resolution information is:
HKEY_LOCAL_MACHINE\SYSTEM\CurrentControlSet\Control\Video
Under this key will be a list of GUIDs and you will need to determine which one corresponds to your video card/driver. Under the GUID, you can set:
\0000\DefaultSettings.XResolution
\0000\DefaultSettings.YResolution
For example: To change the resolution on a VMware Server, search for "Device Description"="VMware SVGA II"
To manually change resolution on a Windows 2008 Core server on the Command Prompt type:
reg export HKEY_LOCAL_MACHINE\SYSTEM\CurrentControlSet\Control\Video /s video.reg
Then you will need to edit the video.reg, change the resolution (The values are on Hex), remove the rest of info and save the file.
This an example from VMware Server machine at 800x600:
---- Start Video800.reg ----
Windows Registry Editor Version 5.00
[HKEY_LOCAL_MACHINE\SYSTEM\CurrentControlSet\Cofntrol\Video\{621060A6-5E79-471A-A468-DD745B2DD17C}\0000]"
DefaultSettings.XResolution"=dword:00000320
"DefaultSettings.YResolution"=dword:00000258
---- End Video800.reg ----
Finally at the command prompt type:
REG IMPORT Video800.reg
Saturday, July 14, 2007
VMware: Install Windows Vista x86 on ESX Server 3.0
1) Create a new VM with at least 512 MB of RAM and a 16 GB Hard Disk.
2) Copy the IMG/ISO of Windows Vista and the Floppy drive image to the ESX host using Veeam FastSCP, or insert the DVD and a Floppy with the driver into the ESX host.
3) Connect the IMG/ISO file to the Windows Vista VM. Make sure the "Connected" is selected.
4) Power on the Windows Vista VM.
5) Vista install starts and then stops at a point where it can't find the CD/DVD driver. A pop-up with "Load Driver" as the title appears indicating that a required device driver at this point.
6) Connect the Floppy drive image (and ensure "Connected" is selected).
7) After ESX has attached the floppy drive, click on "Rescan".
8) Continue the Setup of Windows Vista.
9) Remove the floppy image from the VM or uncheck "Connected".
Download the Floppy Image with the CD-ROM Driver from http://sti.epfl.ch/intranet/informatique/virtualisation/drivers-vista-rtm-esx.flp.zip
2) Copy the IMG/ISO of Windows Vista and the Floppy drive image to the ESX host using Veeam FastSCP, or insert the DVD and a Floppy with the driver into the ESX host.
3) Connect the IMG/ISO file to the Windows Vista VM. Make sure the "Connected" is selected.
4) Power on the Windows Vista VM.
5) Vista install starts and then stops at a point where it can't find the CD/DVD driver. A pop-up with "Load Driver" as the title appears indicating that a required device driver at this point.
6) Connect the Floppy drive image (and ensure "Connected" is selected).
7) After ESX has attached the floppy drive, click on "Rescan".
8) Continue the Setup of Windows Vista.
9) Remove the floppy image from the VM or uncheck "Connected".
Download the Floppy Image with the CD-ROM Driver from http://sti.epfl.ch/intranet/informatique/virtualisation/drivers-vista-rtm-esx.flp.zip
Thursday, July 12, 2007
VMware: Veeam FastSCP for ESX Transfer Timeout
Cannot transfer or edit files on ESX. Transfer timeout. No data transferred in the last 20 seconds.
To fix this problem please check whether the EMC AAM Client is opened for outgoing connections. It should be open to get FastSCP 2.0 work.
(You can enable it through the VI client: Configuration->Security Profile->Properties)
To fix this problem please check whether the EMC AAM Client is opened for outgoing connections. It should be open to get FastSCP 2.0 work.
(You can enable it through the VI client: Configuration->Security Profile->Properties)
VMware: Exchange Server 2003 Performance on VMware ESX Server 3
This paper discusses the performance and scalability of Microsoft Exchange Server 2003 when deployed within virtual machines running under VMware ESX Server 3.01.
http://www.vmware.com/pdf/Virtualizing_Exchange2003.pdf
http://www.vmware.com/pdf/Virtualizing_Exchange2003.pdf
Subscribe to:
Posts (Atom)