The information in this article applies to Microsoft Exchange 2000 Server
http://support.microsoft.com/?kbid=316047
Thursday, April 20, 2006

MS: How to Properly Configure File System Antivirus Software on Exchange Server
Virtual server folders (Program Files\Exchsrvr\mailroot\)
Program Files\McAfee\GroupShield Exchange\i386\qtinewrk
Program Files\McAfee\GroupShield Exchange\i386\quarantine
Exchange databases and log files(\Exchsrvr\MDBData)
Exchange .mta files (\Exchsrvr\Mtadata).
Exchange message tracking log files (\Exchsrvr\Server_Name.log).
Site Replication Service (SRS) files (\Exchsrvr\Srsdata).
Internet Information Service (IIS) system files (\%SystemRoot%\System32\Inetsrv).
Internet Mail Connector files (\Exchsrvr\IMCData).
Exclude files *.chk
Exclude files *.log
Exclude files *.stm
Exclude files *.edb
Program Files\McAfee\GroupShield Exchange\i386\qtinewrk
Program Files\McAfee\GroupShield Exchange\i386\quarantine
Exchange databases and log files(\Exchsrvr\MDBData)
Exchange .mta files (\Exchsrvr\Mtadata).
Exchange message tracking log files (\Exchsrvr\Server_Name.log).
Site Replication Service (SRS) files (\Exchsrvr\Srsdata).
Internet Information Service (IIS) system files (\%SystemRoot%\System32\Inetsrv).
Internet Mail Connector files (\Exchsrvr\IMCData).
Exclude files *.chk
Exclude files *.log
Exclude files *.stm
Exclude files *.edb
MS: NetShield\VirusScan exclusions needed on a Microsoft Exchange 2000 server running GroupShield 5.x for Exchange 2000
Goal and/or Problem Description:
• NetShield\VirusScan exclusions needed on a Microsoft Exchange 2000 server running GroupShield 5.x for Exchange 2000 Problem Environment
• McAfee NetShield 4.5 for Windows
• McAfee VirusScan Enterprise 7.0
• McAfee GroupShield 5.2 for Exchange
• McAfee GroupShield 5.0 for Exchange
• Microsoft Exchange 2000
• Microsoft Windows 2000
Solution:
On a Microsoft Exchange 2000 server running both GroupShield 5.x for Exchange 2000 and NetShield 4.5 or VirusScan Enterprise 7.0, the following exclusions must be added to the NetShield\VirusScan configuration:
Exclude the following GroupShield directories:
• For GroupShield 5.0 for Exchange 2000:
..\Program Files\Network Associates\GroupShield Exchange\i386\qtinewrk
(the quarantine work directory)
..\Program Files\Network Associates\GroupShield Exchange\i386\qtineext
..\Program Files\Network Associates\GroupShield Exchange\i386\Quarantine
(QTINE.MDB resides here; exclude for performance reasons)
..\Program Files\Network Associates\GroupShield Exchange\i386\Log
(LOGFILE.MDB resides here; exclude for performance reasons)
• For GroupShield 5.2 for Exchange 2000:
..\Program Files\McAfee\GroupShield Exchange\i386\qtinewrk
(the quarantine work directory)
..\Program Files\McAfee\GroupShield Exchange\i386\qtineext
..\Program Files\McAfee\GroupShield Exchange\i386\Quarantine
(QTINE.MDB resides here; exclude for performance reasons)
..\Program Files\McAfee\GroupShield Exchange\i386\Log
(LOGFILE.MDB resides here; exclude for performance reasons)
Exclude the following Exchange server directories:
NOTE: NetShield\VirusScan may cause performance and other issues with scanning of database files and transaction logs.
..\exchsrvr\mdbdata
(Information Store data)
..\exchsrvr\mtadata
(Message Transfer Agent data)
..\exchsrvr\mailroot
(STMP service work directories)
..\exchsrvr\srsdata
(site replication service data)
..\exchsrvr\ServerName.log\*.log
(exclude if message tracking is enabled; do not exclude the directory since it is shared)
M:
• NetShield\VirusScan exclusions needed on a Microsoft Exchange 2000 server running GroupShield 5.x for Exchange 2000 Problem Environment
• McAfee NetShield 4.5 for Windows
• McAfee VirusScan Enterprise 7.0
• McAfee GroupShield 5.2 for Exchange
• McAfee GroupShield 5.0 for Exchange
• Microsoft Exchange 2000
• Microsoft Windows 2000
Solution:
On a Microsoft Exchange 2000 server running both GroupShield 5.x for Exchange 2000 and NetShield 4.5 or VirusScan Enterprise 7.0, the following exclusions must be added to the NetShield\VirusScan configuration:
Exclude the following GroupShield directories:
• For GroupShield 5.0 for Exchange 2000:
..\Program Files\Network Associates\GroupShield Exchange\i386\qtinewrk
(the quarantine work directory)
..\Program Files\Network Associates\GroupShield Exchange\i386\qtineext
..\Program Files\Network Associates\GroupShield Exchange\i386\Quarantine
(QTINE.MDB resides here; exclude for performance reasons)
..\Program Files\Network Associates\GroupShield Exchange\i386\Log
(LOGFILE.MDB resides here; exclude for performance reasons)
• For GroupShield 5.2 for Exchange 2000:
..\Program Files\McAfee\GroupShield Exchange\i386\qtinewrk
(the quarantine work directory)
..\Program Files\McAfee\GroupShield Exchange\i386\qtineext
..\Program Files\McAfee\GroupShield Exchange\i386\Quarantine
(QTINE.MDB resides here; exclude for performance reasons)
..\Program Files\McAfee\GroupShield Exchange\i386\Log
(LOGFILE.MDB resides here; exclude for performance reasons)
Exclude the following Exchange server directories:
NOTE: NetShield\VirusScan may cause performance and other issues with scanning of database files and transaction logs.
..\exchsrvr\mdbdata
(Information Store data)
..\exchsrvr\mtadata
(Message Transfer Agent data)
..\exchsrvr\mailroot
(STMP service work directories)
..\exchsrvr\srsdata
(site replication service data)
..\exchsrvr\ServerName.log\*.log
(exclude if message tracking is enabled; do not exclude the directory since it is shared)
M:
Wednesday, April 19, 2006
MS: Microsoft Shared Computer Toolkit
The Shared Computer Toolkit for Windows was designed to help administrators better manage and secure public computers, such as those in kiosks, libraries, Internet cafes, schools, etc. But the toolkit is useful for any situation in which multiple persons use the same computer, including family computing and small business offices where several employees must use the same machine. This article shows you how to get and use the toolkit, which is in beta testing at the time of this writing.
The Toolkit does not run on XP Media Center Edition or XP Pro 64x Edition. It does run on Tablet PC Edition.
Microsoft Shared Computer Toolkit
How to Use Microsoft’s Shared Computer Toolkit
The Toolkit does not run on XP Media Center Edition or XP Pro 64x Edition. It does run on Tablet PC Edition.
Microsoft Shared Computer Toolkit
How to Use Microsoft’s Shared Computer Toolkit
Tuesday, April 18, 2006
CTX: Event ID 1538 in CTXCPUUtilMgmt
Event Type: Warning
Event Source: CTXCPUUtilMgmt
Event Category: (1)
Event ID: 1538
Description:
ProcessManager: Unable to create process object for PID 4972.
Windows system message: 0x5.
http://support.citrix.com/article/CTX108621
Event Source: CTXCPUUtilMgmt
Event Category: (1)
Event ID: 1538
Description:
ProcessManager: Unable to create process object for PID 4972.
Windows system message: 0x5.
http://support.citrix.com/article/CTX108621
MS: How to Run Internet Explorer 7.0 BETA Without Installing It
If you want to test IE7 without the risk of installing a beta software, here is a simple way to do it. This method does not install IE 7 the usual way- instead you just run it from the installer package and hence your system does not get littered with beta dlls all over the place.
1. Download IE7 beta from http://www.microsoft.com/windows/ie/ie7/default.mspx. Save the file at a location from where you want to run it. For example C:\IE7Beta
2. Right click the file and select "Extract Here" option from the Winzip/WinRAR context menu.
3. Once all the files are extracted, find the file named "shlwapi.dll" and delete it.
4. Create a file by name "IEXPLORE.exe.local". Make sure that it does not have the .txt extension. [Go to Tools-> Folder Options -> View -> uncheck "Hide extensions for known file types".]
5. Launch iexplore.exe from the same folder and verify that it works.
6. Right click on iexplore.exe and select "Send To...-> Desktop (Create Shortcut)".
This method also helps in running both IE7 and IE6 side-by-side! A great help for web designers. To uninstall, just delete the folder where you extracted the installation package!
1. Download IE7 beta from http://www.microsoft.com/windows/ie/ie7/default.mspx. Save the file at a location from where you want to run it. For example C:\IE7Beta
2. Right click the file and select "Extract Here" option from the Winzip/WinRAR context menu.
3. Once all the files are extracted, find the file named "shlwapi.dll" and delete it.
4. Create a file by name "IEXPLORE.exe.local". Make sure that it does not have the .txt extension. [Go to Tools-> Folder Options -> View -> uncheck "Hide extensions for known file types".]
5. Launch iexplore.exe from the same folder and verify that it works.
6. Right click on iexplore.exe and select "Send To...-> Desktop (Create Shortcut)".
This method also helps in running both IE7 and IE6 side-by-side! A great help for web designers. To uninstall, just delete the folder where you extracted the installation package!
Monday, April 17, 2006
CTX: How to Migrate Server Farms and the Data Store
Document ID: CTX773628 (New Document ID: CTX677542)
This solution pertains to:
MetaFrame XP for Windows 2000
MetaFrame XP for Microsoft NT Server 4.0, Terminal Server
Use the dsmaint command to migrate a MetaFrame XP farm to a different type of data store (for example, from Access to Microsoft SQL Server, or from Microsoft SQL Server to Oracle).
The dsmaint command can migrate farm data between databases (dsmaint migrate) and reconfigure servers to use the new database (dsmaint config).
The syntax for the dsmaint migrate and dsmaint config commands is shown below (at a command prompt, type a command as one continuous string):
dsmaint migrate /srcdsn:dsnfilename /srcuser:username
/srcpwd:password /dstdsn:dsnfilename /dstuser:username
/dstpwd:password
dsmaint config /user:username /pwd:password /dsn:dsnfilename
Where:
dsnfilename = The DSN file for the database, including the full path.
username = The user name for the database.
password = The password for the database.
Migration can be performed with users logged on to the farm. Stopping and restarting the IMA Service does not affect currently connected sessions.
However, no new connections are allowed until the IMA Service is completely restarted.
IMPORTANT: Restarting the IMA Service on more than ten servers simultaneously can cause the database server to become a bottleneck, resulting in startup delays.
To migrate from Access to Microsoft SQL Server or Oracle
NOTE: Migration from an Access indirect database to a Microsoft SQL Server 2000 direct database using the dsmaint migrate command is not supported with MDAC 2.5 or MDAC 2.6 on all MetaFrame XP platforms. MDAC 2.5 SP1 for Terminal Server 4.0 and MDAC 2.5 SP1 or greater, not including MDAC 2.6, is supported on Windows 2000.
1. Create a new database on Oracle or Microsoft SQL server.
2. Create a new Mf20.dsn file pointing to the new database created in Step
1. By default, the DSN file is located in the following directory:
%ProgramFiles%\Citrix\Independent Management Architecture.
NOTE: Putting Mf20.dsn in the default location overwrites the existing file.
3. On the host server, execute the dsmaint migrate command, entering the current DSN file as the source and the new DSN file created in Step 2 as the destination. If the password for the new database was not changed, the default user name/password is citrix/citrix.
TIP: Enter the complete path (inside quotation marks if the path contains spaces) of the DSN file when required as a parameter for the dsmaint migrate command.
For example:
dsmaint migrate /srcdsn:"c:\program files\citrix\independent
management architecture\mf20.dsn" /srcuser:citrix /srcpwd:citrix
/dstdsn:"c:\NewLocation\New.dsn" /dstuser:DB user /dstpwd:DB password
The migration was successful.
4. Execute dsmaint config on the original host server to point to the new DSN file.
For example: dsmaint config /user:DB user /pwd:DB password /dsn:"c:\New Location\New.dsn"
5. Stop and restart the IMA Service on the host server. When the IMA Service on the host server is restarted, the remaining indirect servers begin accessing the new data store indirectly through the host server..
IMPORTANT: Restarting the IMA Service instead of rebooting might cause the SNMP service to Dr. Watson if SNMP is enabled. This error is benign.
6. Copy the DSN file created in Step 2 to all remaining indirect servers in the farm.
7. Execute dsmaint config on all remaining indirect servers to establish a direct connection to the new database through the DSN copied in Step 6.
8. Stop and restart the IMA Service on all remaining indirect servers in the farm.
TIP: Steps 6 through 8 above can be executed on all the servers from a simple batch file placed in a central location.
This solution pertains to:
MetaFrame XP for Windows 2000
MetaFrame XP for Microsoft NT Server 4.0, Terminal Server
Use the dsmaint command to migrate a MetaFrame XP farm to a different type of data store (for example, from Access to Microsoft SQL Server, or from Microsoft SQL Server to Oracle).
The dsmaint command can migrate farm data between databases (dsmaint migrate) and reconfigure servers to use the new database (dsmaint config).
The syntax for the dsmaint migrate and dsmaint config commands is shown below (at a command prompt, type a command as one continuous string):
dsmaint migrate /srcdsn:dsnfilename /srcuser:username
/srcpwd:password /dstdsn:dsnfilename /dstuser:username
/dstpwd:password
dsmaint config /user:username /pwd:password /dsn:dsnfilename
Where:
dsnfilename = The DSN file for the database, including the full path.
username = The user name for the database.
password = The password for the database.
Migration can be performed with users logged on to the farm. Stopping and restarting the IMA Service does not affect currently connected sessions.
However, no new connections are allowed until the IMA Service is completely restarted.
IMPORTANT: Restarting the IMA Service on more than ten servers simultaneously can cause the database server to become a bottleneck, resulting in startup delays.
To migrate from Access to Microsoft SQL Server or Oracle
NOTE: Migration from an Access indirect database to a Microsoft SQL Server 2000 direct database using the dsmaint migrate command is not supported with MDAC 2.5 or MDAC 2.6 on all MetaFrame XP platforms. MDAC 2.5 SP1 for Terminal Server 4.0 and MDAC 2.5 SP1 or greater, not including MDAC 2.6, is supported on Windows 2000.
1. Create a new database on Oracle or Microsoft SQL server.
2. Create a new Mf20.dsn file pointing to the new database created in Step
1. By default, the DSN file is located in the following directory:
%ProgramFiles%\Citrix\Independent Management Architecture.
NOTE: Putting Mf20.dsn in the default location overwrites the existing file.
3. On the host server, execute the dsmaint migrate command, entering the current DSN file as the source and the new DSN file created in Step 2 as the destination. If the password for the new database was not changed, the default user name/password is citrix/citrix.
TIP: Enter the complete path (inside quotation marks if the path contains spaces) of the DSN file when required as a parameter for the dsmaint migrate command.
For example:
dsmaint migrate /srcdsn:"c:\program files\citrix\independent
management architecture\mf20.dsn" /srcuser:citrix /srcpwd:citrix
/dstdsn:"c:\NewLocation\New.dsn" /dstuser:DB user /dstpwd:DB password
The migration was successful.
4. Execute dsmaint config on the original host server to point to the new DSN file.
For example: dsmaint config /user:DB user /pwd:DB password /dsn:"c:\New Location\New.dsn"
5. Stop and restart the IMA Service on the host server. When the IMA Service on the host server is restarted, the remaining indirect servers begin accessing the new data store indirectly through the host server..
IMPORTANT: Restarting the IMA Service instead of rebooting might cause the SNMP service to Dr. Watson if SNMP is enabled. This error is benign.
6. Copy the DSN file created in Step 2 to all remaining indirect servers in the farm.
7. Execute dsmaint config on all remaining indirect servers to establish a direct connection to the new database through the DSN copied in Step 6.
8. Stop and restart the IMA Service on all remaining indirect servers in the farm.
TIP: Steps 6 through 8 above can be executed on all the servers from a simple batch file placed in a central location.
CTX: MetaFrame Advanced Concepts - Farm Maintenance
This document includes:
Backup and Recovery Strategies
To move or restore an Access data store
Microsoft SQL Server and Oracle Databases
How to Migrate Server Farms and the Data Store
Compacting Access Databases
http://support.citrix.com/article/CTX677542
Backup and Recovery Strategies
To move or restore an Access data store
Microsoft SQL Server and Oracle Databases
How to Migrate Server Farms and the Data Store
Compacting Access Databases
http://support.citrix.com/article/CTX677542
CTX: Troubleshooting IMA Service Failure To Start
http://support.citrix.com/article/CTX105292
More Information
• CTX101917 – Error: Error: Windows could not start the Independent Management Architecture on Local Computer .. and refer to service-specific error code -2147483647.
• CTX105166 – IMA Service Hangs In a Starting State
• CTX103015 – IMA Service Fails on MFPrintss.dll
• CTX104200 – Could not start IMA Service in CTX_MF_IMA_StartIMAService
• CTX103253 – Error: IMA service failed to start with error 2147483649 and failed to load plug-ins
• CTX032712 – Error: "IMA Service Error Message -2147483647"
• CTX101667 – IMA service failed on startup. Service specific error 2147483649
• CTX103048 – IMA Service fails to start when a domain or local user is configured for logon
• CTX101877 – An error occurred while attempting to start the IMA Service. Event ID 3612, 3609, 3601, 7024, 2147483670
• CTX735338 – IMA failed to start with error code 2147483649
More Information
• CTX101917 – Error: Error: Windows could not start the Independent Management Architecture on Local Computer .. and refer to service-specific error code -2147483647.
• CTX105166 – IMA Service Hangs In a Starting State
• CTX103015 – IMA Service Fails on MFPrintss.dll
• CTX104200 – Could not start IMA Service in CTX_MF_IMA_StartIMAService
• CTX103253 – Error: IMA service failed to start with error 2147483649 and failed to load plug-ins
• CTX032712 – Error: "IMA Service Error Message -2147483647"
• CTX101667 – IMA service failed on startup. Service specific error 2147483649
• CTX103048 – IMA Service fails to start when a domain or local user is configured for logon
• CTX101877 – An error occurred while attempting to start the IMA Service. Event ID 3612, 3609, 3601, 7024, 2147483670
• CTX735338 – IMA failed to start with error code 2147483649
MS: Change User
Changes the setting for .ini file mapping.
Syntax
change user {/execute | /install | /query}
Parameters
/execute
Enables .ini file mapping to the home directory. This is the default setting.
/install
Disables .ini file mapping to the home directory. All .ini files are read and written to the system directory. You must disable .ini file mapping when installing applications on a terminal server.
/query
Displays the current setting for .ini file mapping.
/?
Displays help at the command prompt.
Remarks
Use change user /install before installing an application to create .ini files for the application in the system directory. These files are used as master copies for user-specific .ini files. After installing the application, use change user /execute to revert to standard .ini file mapping.
The first time you run the application, it searches the home directory for its .ini files. If the .ini files are not found in the home directory, but are found in the system directory, Terminal Services copies the .ini files to the home directory, ensuring that each user has a unique copy of the application .ini files. Any new .ini files are created in the home directory.
Each user should have a unique copy of the .ini files for an application. This prevents instances where different users might have incompatible application configurations (for example, different default directories or screen resolutions).
When the system is in install mode (that is, change user /install), several things occur. All registry entries that are created are shadowed under HKEY_LOCAL_MACHINE\SOFTWARE\Microsoft\Windows NT\CurrentVersion\TerminalServer\Install. Keys added to HKEY_CURRENT_USER are copied under the \SOFTWARE key, and keys added to HKEY_LOCAL_MACHINE are copied under \MACHINE. If the application queries the Windows directory using system calls, such as GetWindowsDirectory, the terminal server returns the systemroot systemroot The path and folder name where the Windows system files are located. Typically, this is C:\Windows, although you can designate a different drive or folder when you install Windows. You can use the value %systemroot% to replace the actual location of the folder that contains the Windows system files. To identify your systemroot folder, click Start, click Run, type %systemroot%, and then click OK.directory. If any .ini file entries are added using system calls, such as WritePrivateProfileString, they are added to the .ini files under the systemroot directory.
When the system returns to execution mode (that is, change user /execute), and the application tries to read a registry entry under HKEY_CURRENT_USER that does not exist, Terminal Services checks to see whether a copy of the key exists under the \TerminalServer\Install key. If it does, the keys are copied to the appropriate location under HKEY_CURRENT_USER. If the application tries to read from an .ini file that does not exist, Terminal Services searches for that .ini file under the system root. If the .ini file is in the system root, it is copied to the \Windows subdirectory of the user's home directory. If the application queries the Windows directory, the terminal server returns the \Windows subdirectory of the user's home directory.
When you log on, Terminal Services checks whether its system .ini files are newer than the .ini files on your computer. If the system version is newer, your .ini file is either replaced or merged with the newer version. This depends on whether or not the INISYNC bit, 0x40, is set for this .ini file. Your previous version of the .ini file is renamed as Inifile.ctx. If the system registry values under the \TerminalServer\Install key are newer than your version under HKEY_CURRENT_USER, your version of the keys is deleted and replaced with the new keys from \TerminalServer\Install.
Examples
To disable .ini file mapping in the home directory, type:
change user /install
To enable .ini file mapping in the home directory, type:
change user /execute
To display the current setting for .ini file mapping, type:
change user /query
Syntax
change user {/execute | /install | /query}
Parameters
/execute
Enables .ini file mapping to the home directory. This is the default setting.
/install
Disables .ini file mapping to the home directory. All .ini files are read and written to the system directory. You must disable .ini file mapping when installing applications on a terminal server.
/query
Displays the current setting for .ini file mapping.
/?
Displays help at the command prompt.
Remarks
Use change user /install before installing an application to create .ini files for the application in the system directory. These files are used as master copies for user-specific .ini files. After installing the application, use change user /execute to revert to standard .ini file mapping.
The first time you run the application, it searches the home directory for its .ini files. If the .ini files are not found in the home directory, but are found in the system directory, Terminal Services copies the .ini files to the home directory, ensuring that each user has a unique copy of the application .ini files. Any new .ini files are created in the home directory.
Each user should have a unique copy of the .ini files for an application. This prevents instances where different users might have incompatible application configurations (for example, different default directories or screen resolutions).
When the system is in install mode (that is, change user /install), several things occur. All registry entries that are created are shadowed under HKEY_LOCAL_MACHINE\SOFTWARE\Microsoft\Windows NT\CurrentVersion\TerminalServer\Install. Keys added to HKEY_CURRENT_USER are copied under the \SOFTWARE key, and keys added to HKEY_LOCAL_MACHINE are copied under \MACHINE. If the application queries the Windows directory using system calls, such as GetWindowsDirectory, the terminal server returns the systemroot systemroot The path and folder name where the Windows system files are located. Typically, this is C:\Windows, although you can designate a different drive or folder when you install Windows. You can use the value %systemroot% to replace the actual location of the folder that contains the Windows system files. To identify your systemroot folder, click Start, click Run, type %systemroot%, and then click OK.directory. If any .ini file entries are added using system calls, such as WritePrivateProfileString, they are added to the .ini files under the systemroot directory.
When the system returns to execution mode (that is, change user /execute), and the application tries to read a registry entry under HKEY_CURRENT_USER that does not exist, Terminal Services checks to see whether a copy of the key exists under the \TerminalServer\Install key. If it does, the keys are copied to the appropriate location under HKEY_CURRENT_USER. If the application tries to read from an .ini file that does not exist, Terminal Services searches for that .ini file under the system root. If the .ini file is in the system root, it is copied to the \Windows subdirectory of the user's home directory. If the application queries the Windows directory, the terminal server returns the \Windows subdirectory of the user's home directory.
When you log on, Terminal Services checks whether its system .ini files are newer than the .ini files on your computer. If the system version is newer, your .ini file is either replaced or merged with the newer version. This depends on whether or not the INISYNC bit, 0x40, is set for this .ini file. Your previous version of the .ini file is renamed as Inifile.ctx. If the system registry values under the \TerminalServer\Install key are newer than your version under HKEY_CURRENT_USER, your version of the keys is deleted and replaced with the new keys from \TerminalServer\Install.
Examples
To disable .ini file mapping in the home directory, type:
change user /install
To enable .ini file mapping in the home directory, type:
change user /execute
To display the current setting for .ini file mapping, type:
change user /query
MS: Change the Amount of Space that Internet Explorer uses to store temporary Internet files
To change the amount of space that IE uses to store temporary Internet files, you typically open the IE Tools menu, select Internet Options, select the General tab,
then click Settings under the "Temporary Internet files" section. However, you can also adjust this setting in the registry by performing the following steps:
Start a registry editor (e.g., regedit.exe).
Navigate to the
HKEY_CURRENT_USER\Software\Microsoft\Windows\CurrentVersion\Internet Settings\5.0\Cache\Content registry subkey.
Double-click CacheLimit, change the Base to Decimal, enter the amount of space you want to use for
temporary Internet files (in kilobytes) in the "Value data" field, then click OK.
Navigate to the
HKEY_CURRENT_USER\Software\Microsoft\Windows\CurrentVersion\Internet Settings\Cache\Content registry subkey.
Double-click CacheLimit, change the Base to Decimal, enter the same value you entered in Step 3, then click OK.
Close the registry editor.
The next time that IE starts, it will use the new size for the Temporary Internet Files folder.
then click Settings under the "Temporary Internet files" section. However, you can also adjust this setting in the registry by performing the following steps:
Start a registry editor (e.g., regedit.exe).
Navigate to the
HKEY_CURRENT_USER\Software\Microsoft\Windows\CurrentVersion\Internet Settings\5.0\Cache\Content registry subkey.
Double-click CacheLimit, change the Base to Decimal, enter the amount of space you want to use for
temporary Internet files (in kilobytes) in the "Value data" field, then click OK.
Navigate to the
HKEY_CURRENT_USER\Software\Microsoft\Windows\CurrentVersion\Internet Settings\Cache\Content registry subkey.
Double-click CacheLimit, change the Base to Decimal, enter the same value you entered in Step 3, then click OK.
Close the registry editor.
The next time that IE starts, it will use the new size for the Temporary Internet Files folder.
MS: Change the Amount of Space that Internet Explorer uses to store temporary Internet files
To change the amount of space that IE uses to store temporary Internet files, you typically open the IE Tools menu, select Internet Options, select the General tab,
then click Settings under the "Temporary Internet files" section. However, you can also adjust this setting in the registry by performing the following steps:
Start a registry editor (e.g., regedit.exe).
Navigate to the
HKEY_CURRENT_USER\Software\Microsoft\Windows\CurrentVersion\Internet Settings\5.0\Cache\Content registry subkey.
Double-click CacheLimit, change the Base to Decimal, enter the amount of space you want to use for
temporary Internet files (in kilobytes) in the "Value data" field, then click OK.
Navigate to the
HKEY_CURRENT_USER\Software\Microsoft\Windows\CurrentVersion\Internet Settings\Cache\Content registry subkey.
Double-click CacheLimit, change the Base to Decimal, enter the same value you entered in Step 3, then click OK.
Close the registry editor.
The next time that IE starts, it will use the new size for the Temporary Internet Files folder.
then click Settings under the "Temporary Internet files" section. However, you can also adjust this setting in the registry by performing the following steps:
Start a registry editor (e.g., regedit.exe).
Navigate to the
HKEY_CURRENT_USER\Software\Microsoft\Windows\CurrentVersion\Internet Settings\5.0\Cache\Content registry subkey.
Double-click CacheLimit, change the Base to Decimal, enter the amount of space you want to use for
temporary Internet files (in kilobytes) in the "Value data" field, then click OK.
Navigate to the
HKEY_CURRENT_USER\Software\Microsoft\Windows\CurrentVersion\Internet Settings\Cache\Content registry subkey.
Double-click CacheLimit, change the Base to Decimal, enter the same value you entered in Step 3, then click OK.
Close the registry editor.
The next time that IE starts, it will use the new size for the Temporary Internet Files folder.
MS: Change the Amount of Space that Internet Explorer uses to store temporary Internet files
To change the amount of space that IE uses to store temporary Internet files, you typically open the IE Tools menu, select Internet Options, select the General tab,
then click Settings under the "Temporary Internet files" section. However, you can also adjust this setting in the registry by performing the following steps:
Start a registry editor (e.g., regedit.exe).
Navigate to the
HKEY_CURRENT_USER\Software\Microsoft\Windows\CurrentVersion\Internet Settings\5.0\Cache\Content registry subkey.
Double-click CacheLimit, change the Base to Decimal, enter the amount of space you want to use for
temporary Internet files (in kilobytes) in the "Value data" field, then click OK.
Navigate to the
HKEY_CURRENT_USER\Software\Microsoft\Windows\CurrentVersion\Internet Settings\Cache\Content registry subkey.
Double-click CacheLimit, change the Base to Decimal, enter the same value you entered in Step 3, then click OK.
Close the registry editor.
The next time that IE starts, it will use the new size for the Temporary Internet Files folder.
then click Settings under the "Temporary Internet files" section. However, you can also adjust this setting in the registry by performing the following steps:
Start a registry editor (e.g., regedit.exe).
Navigate to the
HKEY_CURRENT_USER\Software\Microsoft\Windows\CurrentVersion\Internet Settings\5.0\Cache\Content registry subkey.
Double-click CacheLimit, change the Base to Decimal, enter the amount of space you want to use for
temporary Internet files (in kilobytes) in the "Value data" field, then click OK.
Navigate to the
HKEY_CURRENT_USER\Software\Microsoft\Windows\CurrentVersion\Internet Settings\Cache\Content registry subkey.
Double-click CacheLimit, change the Base to Decimal, enter the same value you entered in Step 3, then click OK.
Close the registry editor.
The next time that IE starts, it will use the new size for the Temporary Internet Files folder.
MS: HOW TO: Modify the Default SizReqBuf Value in Windows 2000
This article describes how to modify the size of the SizReqBuf value. In File and Printer Sharing for Microsoft Networks, the SizReqBuf value determines how much data is buffered at one time to send to a client. The default values in Windows 2000 provide acceptable levels of performance in typical scenarios. However, on a high-latency connection, you may want to use an increased SizReqBuf value.
http://support.microsoft.com/?kbid=320829
http://support.microsoft.com/?kbid=320829
MS: Command Line Printer Control in Windows 2000 / XP
Many, if not all, printer settings can be done from Windows 2000's command line using PRINTUI.DLL and RUNDLL32.EXE.
RUNDLL32 PRINTUI.DLL,PrintUIEntry /?
More information is available at Microsoft's TechNet under Q189105.
Usage:
RUNDLL32 PRINTUI.DLL,PrintUIEntry [ options ] [ @commandfile ]
/a[file] binary file name
/b[name] base printer name
/c[name] unc machine name if the action is on a remote machine
/dl delete local printer
/dn delete network printer connection
/dd delete printer driver
/e display printing preferences
/f[file] either inf file or output file
/ga add per machine printer connections
/ge enum per machine printer connections
/gd delete per machine printer connections
/h[arch] driver architecture one of the following, Alpha ¦ Intel ¦ Mips ¦ PowerPC
/ia install printer driver using inf file
/id install printer driver using add printer driver wizard
/if install printer using inf file
/ii install printer using add printer wizard with an inf file
/il install printer using add printer wizard
/in add network printer connection
/j[provider] print provider name
/k print test page to specified printer, cant be combined with command when installing a printer
/l[path] printer driver source path
/m[model] printer driver model name
/n[name] printer name
/o display printer queue view
/p display printer properties
/q quiet mode, do not display error messages
/r[port] port name
/s display server properties
/Ss Store printer settings into a file
/Sr Restore printer settings from a file
Store or restore printer settings option flags that must be placed at the end of command:
2 PRINTER_INFO_2
7 PRINTER_INFO_7
c Color Profile
d PrinterData
s Security descriptor
g Global DevMode
m Minimal settings
u User DevMode
r Resolve name conflicts
f Force name
p Resolve port
/u use the existing printer driver if it's already installed
/t[#] zero based index page to start on
/v[version] driver version one of the following, Windows 95 or 98 ¦ Windows NT 3.1 ¦ Windows NT 3.5 or 3.51 ¦ Windows NT 3.51 ¦ Windows NT 4.0 ¦ Windows NT 4.0 or 2000 ¦ Windows 2000
/w prompt the user for a driver if specified driver is not found in the inf
/y set printer as the default
/Xg get printer settings
/Xs set printer settings
/z do not auto share this printer
/Z share this printer, can only be used with the /if option
/? help this message
@[file] command line argument file
Examples:
Run server properties:
RUNDLL32 PRINTUI.DLL,PrintUIEntry /s /t1 /n\\machine
Run printer properties:
RUNDLL32 PRINTUI.DLL,PrintUIEntry /p /n\\machine\printer
Run add printer wizard localy:
RUNDLL32 PRINTUI.DLL,PrintUIEntry /il
Run add printer wizard on \\machine:
RUNDLL32 PRINTUI.DLL,PrintUIEntry /il /c\\machine
Run queue view:
RUNDLL32 PRINTUI.DLL,PrintUIEntry /o /n\\machine\printer
Run inf install:
RUNDLL32 PRINTUI.DLL,PrintUIEntry /if /b "Test Printer" /f %windir%\inf\ntprint.inf /r "lpt1:" /m "AGFA-AccuSet v52.3"
Run add printer wizard using inf:
RUNDLL32 PRINTUI.DLL,PrintUIEntry /ii /f %windir%\inf\ntprint.inf
Add per machine printer connection:
RUNDLL32 PRINTUI.DLL,PrintUIEntry /ga /c\\machine /n\\machine\printer /j"LanMan Print Services"
Delete per machine printer connection:
RUNDLL32 PRINTUI.DLL,PrintUIEntry /gd /c\\machine /n\\machine\printer
Enumerate per machine printer connections:
RUNDLL32 PRINTUI.DLL,PrintUIEntry /ge /c\\machine
Add printer driver using inf:
RUNDLL32 PRINTUI.DLL,PrintUIEntry /ia /c\\machine /m "AGFA-AccuSet v52.3" /h "Intel" /v "Windows 2000" /f %windir%\inf\ntprint.inf
Remove printer driver:
RUNDLL32 PRINTUI.DLL,PrintUIEntry /dd /c\\machine /m "AGFA-AccuSet v52.3" /h "Intel" /v "Windows 2000"
Set printer as default:
RUNDLL32 PRINTUI.DLL,PrintUIEntry /y /n "printer"
Set printer comment:
RUNDLL32 PRINTUI.DLL,PrintUIEntry /Xs /n "printer" comment "My Cool Printer"
Set printer port:
RUNDLL32 PRINTUI.DLL,PrintUIEntry /Xs /n "printer" PortName "port:"
Get printer settings:
RUNDLL32 PRINTUI.DLL,PrintUIEntry /Xg /n "printer"
Get printer settings saving results in a file:
RUNDLL32 PRINTUI.DLL,PrintUIEntry /f "results.txt" /Xg /n "printer"
Set printer settings command usage:
RUNDLL32 PRINTUI.DLL,PrintUIEntry /Xs /n "printer" ?
Store all printer settings into a file:
RUNDLL32 PRINTUI.DLL,PrintUIEntry /Ss /n "printer" /a "file.dat"
Restore all printer settings from a file:
RUNDLL32 PRINTUI.DLL,PrintUI /Sr /n "printer" /a "file.dat"
Store printer information on level 2 into a file:
RUNDLL32 PRINTUI.DLL,PrintUIEntry /Ss /n "printer" /a "file.dat" 2
Restore from a file printer security descriptor:
RUNDLL32 PRINTUI.DLL,PrintUIEntry /Sr /n "printer" /a "file.dat" s
Restore from a file printer global devmode and printer data:
RUNDLL32 PRINTUI.DLL,PrintUIEntry /Sr /n "printer" /a "file.dat" g d
Restore from a file minimum settings and resolve port name:
RUNDLL32 PRINTUI.DLL,PrintUIEntry /Sr /n "printer" /a "file.dat" m p
RUNDLL32 PRINTUI.DLL,PrintUIEntry /?
More information is available at Microsoft's TechNet under Q189105.
Usage:
RUNDLL32 PRINTUI.DLL,PrintUIEntry [ options ] [ @commandfile ]
/a[file] binary file name
/b[name] base printer name
/c[name] unc machine name if the action is on a remote machine
/dl delete local printer
/dn delete network printer connection
/dd delete printer driver
/e display printing preferences
/f[file] either inf file or output file
/ga add per machine printer connections
/ge enum per machine printer connections
/gd delete per machine printer connections
/h[arch] driver architecture one of the following, Alpha ¦ Intel ¦ Mips ¦ PowerPC
/ia install printer driver using inf file
/id install printer driver using add printer driver wizard
/if install printer using inf file
/ii install printer using add printer wizard with an inf file
/il install printer using add printer wizard
/in add network printer connection
/j[provider] print provider name
/k print test page to specified printer, cant be combined with command when installing a printer
/l[path] printer driver source path
/m[model] printer driver model name
/n[name] printer name
/o display printer queue view
/p display printer properties
/q quiet mode, do not display error messages
/r[port] port name
/s display server properties
/Ss Store printer settings into a file
/Sr Restore printer settings from a file
Store or restore printer settings option flags that must be placed at the end of command:
2 PRINTER_INFO_2
7 PRINTER_INFO_7
c Color Profile
d PrinterData
s Security descriptor
g Global DevMode
m Minimal settings
u User DevMode
r Resolve name conflicts
f Force name
p Resolve port
/u use the existing printer driver if it's already installed
/t[#] zero based index page to start on
/v[version] driver version one of the following, Windows 95 or 98 ¦ Windows NT 3.1 ¦ Windows NT 3.5 or 3.51 ¦ Windows NT 3.51 ¦ Windows NT 4.0 ¦ Windows NT 4.0 or 2000 ¦ Windows 2000
/w prompt the user for a driver if specified driver is not found in the inf
/y set printer as the default
/Xg get printer settings
/Xs set printer settings
/z do not auto share this printer
/Z share this printer, can only be used with the /if option
/? help this message
@[file] command line argument file
Examples:
Run server properties:
RUNDLL32 PRINTUI.DLL,PrintUIEntry /s /t1 /n\\machine
Run printer properties:
RUNDLL32 PRINTUI.DLL,PrintUIEntry /p /n\\machine\printer
Run add printer wizard localy:
RUNDLL32 PRINTUI.DLL,PrintUIEntry /il
Run add printer wizard on \\machine:
RUNDLL32 PRINTUI.DLL,PrintUIEntry /il /c\\machine
Run queue view:
RUNDLL32 PRINTUI.DLL,PrintUIEntry /o /n\\machine\printer
Run inf install:
RUNDLL32 PRINTUI.DLL,PrintUIEntry /if /b "Test Printer" /f %windir%\inf\ntprint.inf /r "lpt1:" /m "AGFA-AccuSet v52.3"
Run add printer wizard using inf:
RUNDLL32 PRINTUI.DLL,PrintUIEntry /ii /f %windir%\inf\ntprint.inf
Add per machine printer connection:
RUNDLL32 PRINTUI.DLL,PrintUIEntry /ga /c\\machine /n\\machine\printer /j"LanMan Print Services"
Delete per machine printer connection:
RUNDLL32 PRINTUI.DLL,PrintUIEntry /gd /c\\machine /n\\machine\printer
Enumerate per machine printer connections:
RUNDLL32 PRINTUI.DLL,PrintUIEntry /ge /c\\machine
Add printer driver using inf:
RUNDLL32 PRINTUI.DLL,PrintUIEntry /ia /c\\machine /m "AGFA-AccuSet v52.3" /h "Intel" /v "Windows 2000" /f %windir%\inf\ntprint.inf
Remove printer driver:
RUNDLL32 PRINTUI.DLL,PrintUIEntry /dd /c\\machine /m "AGFA-AccuSet v52.3" /h "Intel" /v "Windows 2000"
Set printer as default:
RUNDLL32 PRINTUI.DLL,PrintUIEntry /y /n "printer"
Set printer comment:
RUNDLL32 PRINTUI.DLL,PrintUIEntry /Xs /n "printer" comment "My Cool Printer"
Set printer port:
RUNDLL32 PRINTUI.DLL,PrintUIEntry /Xs /n "printer" PortName "port:"
Get printer settings:
RUNDLL32 PRINTUI.DLL,PrintUIEntry /Xg /n "printer"
Get printer settings saving results in a file:
RUNDLL32 PRINTUI.DLL,PrintUIEntry /f "results.txt" /Xg /n "printer"
Set printer settings command usage:
RUNDLL32 PRINTUI.DLL,PrintUIEntry /Xs /n "printer" ?
Store all printer settings into a file:
RUNDLL32 PRINTUI.DLL,PrintUIEntry /Ss /n "printer" /a "file.dat"
Restore all printer settings from a file:
RUNDLL32 PRINTUI.DLL,PrintUI /Sr /n "printer" /a "file.dat"
Store printer information on level 2 into a file:
RUNDLL32 PRINTUI.DLL,PrintUIEntry /Ss /n "printer" /a "file.dat" 2
Restore from a file printer security descriptor:
RUNDLL32 PRINTUI.DLL,PrintUIEntry /Sr /n "printer" /a "file.dat" s
Restore from a file printer global devmode and printer data:
RUNDLL32 PRINTUI.DLL,PrintUIEntry /Sr /n "printer" /a "file.dat" g d
Restore from a file minimum settings and resolve port name:
RUNDLL32 PRINTUI.DLL,PrintUIEntry /Sr /n "printer" /a "file.dat" m p
Windows vs Linux: Role Comparison Report: Web Server Role
This study is intended to provide guidance to the information technology manager who must make platform acquisition and deployment decisions to both maximize value and minimize security risk.
One of the most common uses of a server platform is to host and deploy distributed applications over the Web. This study presents a role-based comparison of the relative security of two different platforms, based on quantitative factorssuch as numbers of security software flaws and time to patchand qualitative factorssuch as ease of configuration and default security stance.
Whitepaper Link
One of the most common uses of a server platform is to host and deploy distributed applications over the Web. This study presents a role-based comparison of the relative security of two different platforms, based on quantitative factorssuch as numbers of security software flaws and time to patchand qualitative factorssuch as ease of configuration and default security stance.
Whitepaper Link
MS: To enable DHCP server logging
1. Open DHCP.
• To open DHCP, click Start, click Settings, click Control Panel, double-click Administrative Tools, and then double-click DHCP.
2. In the console tree, click the applicable DHCP server.
• DHCP/applicable DHCP server
3. On the Action menu, click Properties.
4. On the General tab, select Enable DHCP audit logging, and then click OK.
The directory path in which the DHCP server stores audit log files. DHCP audit logs are located by default at %windir%\System32\Dhcp.
• To open DHCP, click Start, click Settings, click Control Panel, double-click Administrative Tools, and then double-click DHCP.
2. In the console tree, click the applicable DHCP server.
• DHCP/applicable DHCP server
3. On the Action menu, click Properties.
4. On the General tab, select Enable DHCP audit logging, and then click OK.
The directory path in which the DHCP server stores audit log files. DHCP audit logs are located by default at %windir%\System32\Dhcp.
MS: MS DTC Error 53258
Errors:
53258
MS DTC could not correctly process a DC Promotion/Demotion event. MS DTC
will continue to function and will use the existing security settings. Error
Specifics: d:\srvrtm\com\complus\dtc\dtc\adme\uiname.cpp:9280, Pid: 576
No Callstack,
CmdLine: C:\WINDOWS\system32\msdtc.exe
53258
MS DTC could not correctly process a DC Promotion/Demotion event. MS DTC
will continue to function and will use the existing security settings. Error
Specifics: %1
Solution:
Run the Component Services MMC snap-in: Start -> Administrative Tools -> Component Services
Browse to: Console Root -> Component Services -> Computers -> My Computer
Right click My Computer, and click "Stop MSDTC"
Select the "MSDTC" tab. On the bottom of the tab page, click the "Security Configuration" button. A new dialog will open.
Enable "Network DTC Access"
Then, right click My Computer again, and click "Start MSDTC"
53258
MS DTC could not correctly process a DC Promotion/Demotion event. MS DTC
will continue to function and will use the existing security settings. Error
Specifics: d:\srvrtm\com\complus\dtc\dtc\adme\uiname.cpp:9280, Pid: 576
No Callstack,
CmdLine: C:\WINDOWS\system32\msdtc.exe
53258
MS DTC could not correctly process a DC Promotion/Demotion event. MS DTC
will continue to function and will use the existing security settings. Error
Specifics: %1
Solution:
Run the Component Services MMC snap-in: Start -> Administrative Tools -> Component Services
Browse to: Console Root -> Component Services -> Computers -> My Computer
Right click My Computer, and click "Stop MSDTC"
Select the "MSDTC" tab. On the bottom of the tab page, click the "Security Configuration" button. A new dialog will open.
Enable "Network DTC Access"
Then, right click My Computer again, and click "Start MSDTC"
MS: Disable Shutdown Event Tracker in Windows 2003 and Windows 2008
To disable Shutdown Event Tracker perform the following:
Open Group Policy, then load the group policy you want to apply the change to.
Note: On a computer that is not a part of a domain you can set this feature locally by running GPEDIT.MSC from the Run command.
Expand Computer Configuration >
Administrative Templates >
System.
Double-click Display Shutdown Event Tracker.
Select Disabled.
Open Group Policy, then load the group policy you want to apply the change to.
Note: On a computer that is not a part of a domain you can set this feature locally by running GPEDIT.MSC from the Run command.
Expand Computer Configuration >
Administrative Templates >
System.
Double-click Display Shutdown Event Tracker.
Select Disabled.
MS: Migrate File & Print Server a Cluster
1. Create cluster
2. Create Resource Group(s)
3. Create Printers and share them
4. Create File Shares
5. Migrate File data using Robocopy
6. Create new logon scripts and script to remap home drives
7. Create printer script to change all printers to the new location
8. Migrate a few test users in a pilot
9. Use robocopy on a regular basis to keep all content synched
10. test, test, and test some more with more pilot users until confident
that everything works
11. Migrate everyone else
12. Retire old server
2. Create Resource Group(s)
3. Create Printers and share them
4. Create File Shares
5. Migrate File data using Robocopy
6. Create new logon scripts and script to remap home drives
7. Create printer script to change all printers to the new location
8. Migrate a few test users in a pilot
9. Use robocopy on a regular basis to keep all content synched
10. test, test, and test some more with more pilot users until confident
that everything works
11. Migrate everyone else
12. Retire old server
Sunday, April 16, 2006
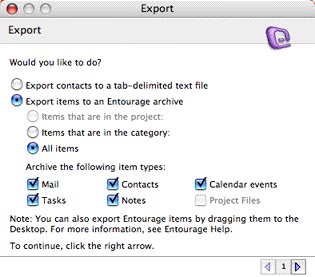
MAC: Backup Entourage 2004
 Backup Entourage 2004
Entourage 2004 includes Export for:
Contacts
Calendar events
Tasks
Notes
Project Files
Another option is to backup the entire directory with your identity. The default location is:
Hard Disk Name/Users/user_name/Documents/Microsoft User Data/Office 2004 Identities/Main Identity
More info: http://support.microsoft.com/kb/268323
Saturday, April 15, 2006
Friday, April 14, 2006
MS: Microsoft.com Moves to x64 Version of Windows
Microsoft.com Moves to x64 Version of Windows
In March 2004, approximately one year in advance of the official release of Microsoft® Windows Server™ 2003 x64 Edition, Microsoft.com decided to evaluate the benefits of implementing servers built on the x64-based hardware platform by running prerelease versions of that operating system on production www.microsoft.com Web servers. By April 2005, 100 percent of the production Web servers for Microsoft.com were running on the x64-based hardware and operating system platforms.
The resulting platform upgrade to the x64 version of Windows has drastically increased the mean time between application and Web service recycling for Microsoft.com Web servers, thereby increasing the overall site availability. More impressively, the CPU load on the servers decreased by 50 percent, and page response times for some applications are up to fifteen times faster.
Link
In March 2004, approximately one year in advance of the official release of Microsoft® Windows Server™ 2003 x64 Edition, Microsoft.com decided to evaluate the benefits of implementing servers built on the x64-based hardware platform by running prerelease versions of that operating system on production www.microsoft.com Web servers. By April 2005, 100 percent of the production Web servers for Microsoft.com were running on the x64-based hardware and operating system platforms.
The resulting platform upgrade to the x64 version of Windows has drastically increased the mean time between application and Web service recycling for Microsoft.com Web servers, thereby increasing the overall site availability. More impressively, the CPU load on the servers decreased by 50 percent, and page response times for some applications are up to fifteen times faster.
Link
Thursday, April 13, 2006
MS: Using Secedit.exe to Force Group Policy to Be Applied Again (Windows 2000)
Using Secedit.exe to Force Group Policy to Be Applied Again (Windows 2000)
http://support.microsoft.com/?kbid=227448
http://support.microsoft.com/?kbid=227448
MS: Windows PE: To configure a hard drive by using DiskPart
Windows PE: To configure a hard drive by using DiskPart
Boot Windows PE on the device.
At the command prompt, type DiskPart. The DiskPart command prompt is displayed.
To display the DiskPart help, type ?.
Use the DiskPart commands to list the current configurations, select a disk, or edit a partition.
For example, to create a 400 MB primary partition on the second disk in your system, use the following Diskpart commands:
list disk
select disk 1
list partition
create partition primary size=400
After you configure the hard disk, stop the utility by typing exit.
Reboot the device.
Boot Windows PE on the device.
At the command prompt, type DiskPart. The DiskPart command prompt is displayed.
To display the DiskPart help, type ?.
Use the DiskPart commands to list the current configurations, select a disk, or edit a partition.
For example, to create a 400 MB primary partition on the second disk in your system, use the following Diskpart commands:
list disk
select disk 1
list partition
create partition primary size=400
After you configure the hard disk, stop the utility by typing exit.
Reboot the device.
DEVELOPER: How To Change Passwords Programmatically in Windows
How To Change Passwords Programmatically in Windows
http://support.microsoft.com/?kbid=187535
http://support.microsoft.com/?kbid=187535
MAC: Starting MAC OS X in Safe Mode
Mac OS X 10.2, 10.3: Starting up in Safe Mode
To start up into Safe Mode (to "Safe Boot"), do this:
Be sure the computer is shut down.
Press the power button.
Immediately after you hear the startup tone, press and hold the Shift key. Tip: The Shift key should be held as soon as possible after the startup tone but not before.
Release the Shift key when you see the gray Apple and progress indicator (looks like a spinning gear).
During the startup, you will see "Safe Boot" on the Mac OS X startup screen.
To leave Safe Mode, restart the computer normally, without holding any keys during startup.
To start up into Safe Mode (to "Safe Boot"), do this:
Be sure the computer is shut down.
Press the power button.
Immediately after you hear the startup tone, press and hold the Shift key. Tip: The Shift key should be held as soon as possible after the startup tone but not before.
Release the Shift key when you see the gray Apple and progress indicator (looks like a spinning gear).
During the startup, you will see "Safe Boot" on the Mac OS X startup screen.
To leave Safe Mode, restart the computer normally, without holding any keys during startup.
ANTIVIRUS: VirusScan - Uninstall the framework services
VirusScan - Uninstall the framework services
C:\Program Files\Network Associates\Common Framework\frminst.exe /remove=updater or
frminst.exe /forceuninstall
Remove the following keys from the registry:
HKEY_LOCAL_MACHINE\SYSTEM\ControlSet001\Enum\Root\Legacy_McAfee Framework
HKEY_LOCAL_MACHINE\SYSTEM\ControlSet002\Enum\Root\Legacy_McAfee Framework
HKEY_LOCAL_MACHINE\SYSTEM\ControlSet003\Enum\Root\Legacy_McAfee Framework
Select 'Security | Permissions' from the tool bar and give yourself full permissions to the root keys:
HKEY_LOCAL_MACHINE\SYSTEM\CurrentControlSet\Services\McAfee Framework
HKEY_LOCAL_MACHINE\SOFTWARE\Network Associates\TVD
HKEY_LOCAL_MACHINE\SOFTWARE\Network Associates\ePolicy Orchestrator
Delete the following directories:
C:\Program Files\Network Associates\Common Framework
C:\Documents and Settings\All Users\Application Data\Network Associates
If for any reason it states that some of the .DLL files cannot be deleted, then stop the UpdaterUI process and then remove the .DLL files that are giving you trouble.
The UpdaterUI process has control of some of the ePO 3.0 agent .DLL files.
Reinstall VirusScan Enterprise 7.0 and FRAMEPKG.EXE
C:\Program Files\Network Associates\Common Framework\frminst.exe /remove=updater or
frminst.exe /forceuninstall
Remove the following keys from the registry:
HKEY_LOCAL_MACHINE\SYSTEM\ControlSet001\Enum\Root\Legacy_McAfee Framework
HKEY_LOCAL_MACHINE\SYSTEM\ControlSet002\Enum\Root\Legacy_McAfee Framework
HKEY_LOCAL_MACHINE\SYSTEM\ControlSet003\Enum\Root\Legacy_McAfee Framework
Select 'Security | Permissions' from the tool bar and give yourself full permissions to the root keys:
HKEY_LOCAL_MACHINE\SYSTEM\CurrentControlSet\Services\McAfee Framework
HKEY_LOCAL_MACHINE\SOFTWARE\Network Associates\TVD
HKEY_LOCAL_MACHINE\SOFTWARE\Network Associates\ePolicy Orchestrator
Delete the following directories:
C:\Program Files\Network Associates\Common Framework
C:\Documents and Settings\All Users\Application Data\Network Associates
If for any reason it states that some of the .DLL files cannot be deleted, then stop the UpdaterUI process and then remove the .DLL files that are giving you trouble.
The UpdaterUI process has control of some of the ePO 3.0 agent .DLL files.
Reinstall VirusScan Enterprise 7.0 and FRAMEPKG.EXE
Wednesday, April 12, 2006
COMUNICATIONS: BlackBerry & Goodlink Support Forum
BlackBerry & Goodlink Support Forum
Regard Corporation - BlackBerry Support
http://www.regard.com/bb_support
Tek-Tips Forums - BlackBerry & GoodLink Forum
http://www.tek-tips.com/threadminder.cfm?pid=952
Regard Corporation - BlackBerry Support
http://www.regard.com/bb_support
Tek-Tips Forums - BlackBerry & GoodLink Forum
http://www.tek-tips.com/threadminder.cfm?pid=952
COMMUNICATIONS: GoodLink
GoodLink
Es la competencia de BlackBerry.
Mensajería inalámbrica global para dispositivos Palm y Windows Mobile
http://www.good.com
Es la competencia de BlackBerry.
Mensajería inalámbrica global para dispositivos Palm y Windows Mobile
http://www.good.com
DEVELOPMENT: REALbasic
REALbasic
Con esta herramienta de desarrollo similar a Visual Basic podemos desarrollar en entorno Windows, MAC y Linux con el mismo código.
Tiene utilidades para portar código de Visual Basic.
http://www.realsoftware.com
Con esta herramienta de desarrollo similar a Visual Basic podemos desarrollar en entorno Windows, MAC y Linux con el mismo código.
Tiene utilidades para portar código de Visual Basic.
http://www.realsoftware.com
MAC: Think Secret
MAC: Think Secret - Apple Mac Insider News
Sitio con mucha info acerca de Apple y sus productos
http://www.thinksecret.com
Sitio con mucha info acerca de Apple y sus productos
http://www.thinksecret.com
SECURITY: bv-Control
The bv-Control portfolio of products allows administrators to audit, secure and manage operating systems, directories, applications and databases from a single common console. The software suite also provides in-depth auditing and reporting, as well as closed-loop problem identification and remediation, automating many tasks and allowing administrators to efficiently and securely manage the IT environment.
http://www.bindview.com/Products/bvControl
http://www.bindview.com/Products/bvControl
Tuesday, April 11, 2006
LINK: You Had Me At EHLO (Exchange Blogs)
You Had Me At EHLO...
aka the Microsoft Exchange Team Blog
One of the best blogs about Exchange
http://blogs.technet.com/exchange
aka the Microsoft Exchange Team Blog
One of the best blogs about Exchange
http://blogs.technet.com/exchange
MS: How to Set Size Limits for Messages
How to Set Size Limits for Messages
It is possible to set size limits for messages in your Exchange organization on several objects in Exchange System Manager. This article will show you where you can set these limits and how they interact.
http://www.msexchange.org/tutorials/Set-Size-Limits-Messages.html
It is possible to set size limits for messages in your Exchange organization on several objects in Exchange System Manager. This article will show you where you can set these limits and how they interact.
http://www.msexchange.org/tutorials/Set-Size-Limits-Messages.html
Monday, April 10, 2006
SHOP: GO-L Computers
 GO-L Computers
You can find in this site the more advanced computers and beautiful in the web.
Laptops, Workstations, Servers, LCD Monitors, etc.
http://www.go-l.com
TOOLS: MailMeter
MailMeter Storage Management
PST and Email Storage Nightmares?
Your mail server was never intended to be a storage system for the amount of email traffic that overwhelms organizations today.
MailMeter Storage Management saves the attachments from every email to a separate archive file location and deletes the original from your active mail server.
MailMeter Storage Management can:
Reduce the size of the email store significantly
Reduce backup times from over 24 hours, so no data is missed.
Improve reliability and performance of mail server
Eliminate the need for personal quotas
Eliminate the need for PST or NSF files and all the headaches associated with them
http://www.waterfordtechnologies.com/products/MailMeterSM/index.asp
PST and Email Storage Nightmares?
Your mail server was never intended to be a storage system for the amount of email traffic that overwhelms organizations today.
MailMeter Storage Management saves the attachments from every email to a separate archive file location and deletes the original from your active mail server.
MailMeter Storage Management can:
Reduce the size of the email store significantly
Reduce backup times from over 24 hours, so no data is missed.
Improve reliability and performance of mail server
Eliminate the need for personal quotas
Eliminate the need for PST or NSF files and all the headaches associated with them
http://www.waterfordtechnologies.com/products/MailMeterSM/index.asp
LINK: browsers.evolt.org
This site contains probably the largest collection of internet browsers in the Web.
http://browsers.evolt.org
http://browsers.evolt.org
LINK: VideoHelp
VideoHelp
This site will help you to make your own VideoCDs, SVCDs or DVDs that can be played on your standalone DVD Player from video sources like DVD, Video, TV, DV, Cam or downloaded movie clips like DivX, MOV, RM, WMV and ASF. We also have extensive lists of Capture Cards, DVD Media, computer DVD Writers, desktop DVD Recorders and desktop DVD Players with features, compatibility information and user comments.
http://www.videohelp.com
This site will help you to make your own VideoCDs, SVCDs or DVDs that can be played on your standalone DVD Player from video sources like DVD, Video, TV, DV, Cam or downloaded movie clips like DivX, MOV, RM, WMV and ASF. We also have extensive lists of Capture Cards, DVD Media, computer DVD Writers, desktop DVD Recorders and desktop DVD Players with features, compatibility information and user comments.
http://www.videohelp.com
TOOLS: DVD Identifier
'DVD Identifier' retrieves and interprets the pre-recorded information that is present on DVD media (DVD+R, DVD+R DLL, DVD+RW, DVD+RW DLL, DVD-R, DVD-R DLL, DVD-RW and dvd-ram) and on Blu-ray media (bd-r and bd-re). This information contains a variety of parameters such as disc manufacturing information and supported write speeds. Even though this information is usually printed on the packaging, the brand name may differ from the actual manufacturer or sometimes there might not even be any packaging information at all.
http://dvdplusid.cdfreaks.com
http://dvdplusid.cdfreaks.com
TOOLS: EffeTech Network Monitoring Software
EffeTech Network Monitoring Software
EffeTech develops a series of award winning, powerful Internet security software for parents, network administrators, managers and network protocol developers. The purpose of these groundbreaking sniffer software is to monitor Internet abuse and to unveil information inside packets, such as url of http, instant messages of MSN messenger, AIM and ICQ, password of http, ftp, smtp, pop3, and telnet. All EffeTech applications are compatible with Win9x/ME/NT4/2000/XP.
http://www.effetech.com
EffeTech develops a series of award winning, powerful Internet security software for parents, network administrators, managers and network protocol developers. The purpose of these groundbreaking sniffer software is to monitor Internet abuse and to unveil information inside packets, such as url of http, instant messages of MSN messenger, AIM and ICQ, password of http, ftp, smtp, pop3, and telnet. All EffeTech applications are compatible with Win9x/ME/NT4/2000/XP.
http://www.effetech.com
MS: Microsoft Solution Accelerator for Business Desktop Deployment
Microsoft Solution Accelerator for Business Desktop Deployment
The Microsoft Solution Accelerator for Business Desktop Deployment (BDD) delivers end-to-end guidance for efficient planning, building, testing, and deploying Microsoft Windows XP Professional x64 edition, Windows XP Tablet PC Edition, and Office Professional 2003 Editions. It helps IT professionals realize a quick return on investment while also setting new standards for reliability, performance, security, and ease of use.
http://www.microsoft.com/technet/desktopdeployment/bddoverview.mspx
The Microsoft Solution Accelerator for Business Desktop Deployment (BDD) delivers end-to-end guidance for efficient planning, building, testing, and deploying Microsoft Windows XP Professional x64 edition, Windows XP Tablet PC Edition, and Office Professional 2003 Editions. It helps IT professionals realize a quick return on investment while also setting new standards for reliability, performance, security, and ease of use.
http://www.microsoft.com/technet/desktopdeployment/bddoverview.mspx
LINK: Sysinternals
The Sysinternals web site provides you with advanced utilities, technical information, and source code related to Windows internals that you won't find anywhere else. Mark Russinovich and Bryce Cogswell alone write and update everything here.
One of the best (and favorite) site with *technical* tools!
http://www.sysinternals.com
One of the best (and favorite) site with *technical* tools!
http://www.sysinternals.com
LINK: Almost Every file format in the world!
Almost Every file format in the world!
This site compile almost every file format on the planet.
http://www.ace.net.nz/tech/TechFileFormat.html
This site compile almost every file format on the planet.
http://www.ace.net.nz/tech/TechFileFormat.html
TOOLS: enteo Management Suite for Citrix
enteo Management Suite for Citrix
enteo Management Suite for Citrix offers the proper toolset to handle all arising tasks and provides a consistent way of automated step by step probem resolution. As a result of this approach it allows for a always current, reliable and available Citrix Access Infrastructure
http://www.enteo.com/portal/loader.php?seite=management_suite_for_citrix_en
enteo Management Suite for Citrix offers the proper toolset to handle all arising tasks and provides a consistent way of automated step by step probem resolution. As a result of this approach it allows for a always current, reliable and available Citrix Access Infrastructure
http://www.enteo.com/portal/loader.php?seite=management_suite_for_citrix_en
MS: How to override the license server discovery process in Windows Server 2003 Terminal Services
How to override the license server discovery process in Windows Server 2003 Terminal Services
http://support.microsoft.com/default.aspx?scid=kb;en-us;q279561
http://support.microsoft.com/default.aspx?scid=kb;en-us;q279561
LINK: PlanetaAMD64
Planeta AMD64
Excelent site about Windows x64. Info, forums, drivers and downloads
http://www.planetamd64.com
Excelent site about Windows x64. Info, forums, drivers and downloads
http://www.planetamd64.com
ONLINE SERVICE: Plaxo
Plaxo
You update your info, your friends update theirs, and everyone stays in touch! Download any of the toolbars below to access a single up-to-date address book across all of the applications you use.
- Update your address book when friends change their contact info
- Update friends' address books when your contact info changes
- Sync your contacts, calendar, tasks, notes across Plaxo-enabled applications
- Get reminded of a friend's birthday just a few days before
- Receive a Plaxo alert whenever a contact's info has changed
http://www.plaxo.com
You update your info, your friends update theirs, and everyone stays in touch! Download any of the toolbars below to access a single up-to-date address book across all of the applications you use.
- Update your address book when friends change their contact info
- Update friends' address books when your contact info changes
- Sync your contacts, calendar, tasks, notes across Plaxo-enabled applications
- Get reminded of a friend's birthday just a few days before
- Receive a Plaxo alert whenever a contact's info has changed
http://www.plaxo.com
MS: Terminal Services printer redirection not signaled on change to server-side Device Settings tab in Windows 2000 or Windows Server 2003
Terminal Services printer redirection not signaled on change to server-side Device Settings tab in Windows 2000 or Windows Server 2003
http://support.microsoft.com/?kbid=243942
http://support.microsoft.com/?kbid=243942
MS: How to enable user environment debug logging in retail builds of Windows
How to enable user environment debug logging in retail builds of Windows
http://support.microsoft.com/?kbid=221833
http://support.microsoft.com/?kbid=221833
LINK: spsfaq.com
SPS FAQ - SharePoint Server Frequently Asked Questions
Great site about SharePoint
http://www.spsfaq.com
Great site about SharePoint
http://www.spsfaq.com
LINK: spywareinfo.com
SpywareInfo
Forums and downloads info related with Spyware. One of the best sites!
http://www.spywareinfo.com
Forums and downloads info related with Spyware. One of the best sites!
http://www.spywareinfo.com
MS: How To Manually Remove a Single Exchange-based Server from Active Directory
How To Manually Remove a Single Exchange-based Server from Active Directory
http://support.microsoft.com/?kbid=278918
http://support.microsoft.com/?kbid=278918
CTX: How to Install Notes R5 Client on a Citrix MetaFrame Server
How to Install Notes R5 Client on a Citrix MetaFrame Server
http://www-1.ibm.com/support/docview.wss?rs=463&uid=swg21107325
http://www-1.ibm.com/support/docview.wss?rs=463&uid=swg21107325
TOOLS: MonitorMagic
MonitorMagic - Server and Network Monitoring
Pro-active monitoring and management
MonitorMagic is a pro-active monitoring and management solution for Windows 2003, 2000, NT servers, workstations and SNMP-compatible devices. MonitorMagic integrates with popular applications and hardware vendors, such as Microsoft Exchange & SQL Server, ISA Server, Veritas Backup Exec, Symantec & McAfee Anti-Virus, Dell OpenManage, Compaq Insight Manager, IBM Directory, Cisco and many more.
http://www.tools4ever.com/products/monitormagic
Pro-active monitoring and management
MonitorMagic is a pro-active monitoring and management solution for Windows 2003, 2000, NT servers, workstations and SNMP-compatible devices. MonitorMagic integrates with popular applications and hardware vendors, such as Microsoft Exchange & SQL Server, ISA Server, Veritas Backup Exec, Symantec & McAfee Anti-Virus, Dell OpenManage, Compaq Insight Manager, IBM Directory, Cisco and many more.
http://www.tools4ever.com/products/monitormagic
TOOLS: Sitescope
Mercury SiteScope -System Monitoring Solution
This proactive, Web-based infrastructure monitoring and network monitoring solution is lightweight, highly customizable, and doesn't require high overhead agents on your production systems. With Mercury SiteScope, you gain the real-time information you need to verify infrastructure operations, stay apprised of problems, and solve bottlenecks before they become critical.
http://www.mercury.com/us/products/business-availability-center/sitescope
This proactive, Web-based infrastructure monitoring and network monitoring solution is lightweight, highly customizable, and doesn't require high overhead agents on your production systems. With Mercury SiteScope, you gain the real-time information you need to verify infrastructure operations, stay apprised of problems, and solve bottlenecks before they become critical.
http://www.mercury.com/us/products/business-availability-center/sitescope
Friday, April 07, 2006
CERTIFICATION: Citrix Test 1Y0-252 passed!
Today I passed the Citrix Test 1Y0-252: Citrix MetaFrame Presentation Server 3.0: Troubleshooting Enterprise Environment. I need one more (1Y0-251) to get Citrix Certified Enterprise Administrator for MetaFrame Access Suite 3.0 (CCEA) certification.
The manual for this test is one of the most useful certifications books. Highly recommended if you implement or support Citrix!
Exam Statistics:
09 Citrix Exams
03 Citrix Certifications
17 Microsoft Exams
07 Microsoft Certifications
http://www.musumeci.com.ar/Web_English/certificaciones_eng.htm
The manual for this test is one of the most useful certifications books. Highly recommended if you implement or support Citrix!
Exam Statistics:
09 Citrix Exams
03 Citrix Certifications
17 Microsoft Exams
07 Microsoft Certifications
http://www.musumeci.com.ar/Web_English/certificaciones_eng.htm
CTX: Known Citrix Ports
ICA - TCP: 1494
IMA - TCP: 2512
Citrix Management Console - TCP: 2513
SSL - TCP: 443
Secure Ticketing Authority (IIS) - TCP: 80
TCP Browsing - UDP: 1604
XML - TCP: 80
Citrix License Management Console - TCP: 8082
Presentation Server Licensing - TCP: 27000
ICA session w/ Session Reliability enabled - TCP: 2598
IMA - TCP: 2512
Citrix Management Console - TCP: 2513
SSL - TCP: 443
Secure Ticketing Authority (IIS) - TCP: 80
TCP Browsing - UDP: 1604
XML - TCP: 80
Citrix License Management Console - TCP: 8082
Presentation Server Licensing - TCP: 27000
ICA session w/ Session Reliability enabled - TCP: 2598
CTX: Citrix Methodology Process - Define The Issue
Citrix Methodology Process
1.- Define The Issue
Define The Issue is the first step in the Citrix Troubleshooting methodology. The administrator analyzes general information to define the most likely cause of the issue.
Wednesday, April 05, 2006
MS: Microsoft Virtual Server 2005 R2 now is FREE
Virtual Server 2005 R2: Now Available as a Free Download
http://www.microsoft.com/windowsserversystem/virtualserver
http://www.microsoft.com/windowsserversystem/virtualserver
CTX: Install Citrix Hot Fixes
To install Citrix Hot Fixes in unattended mode:
msiexec /update "PSE400W2K3R01.msp" /passive /norestart
If we want to restart machine, we need to replace /norestart for /forcerestart.
If we want a quiet install, we need to replace /passive for /qn.
msiexec /update "PSE400W2K3R01.msp" /passive /norestart
If we want to restart machine, we need to replace /norestart for /forcerestart.
If we want a quiet install, we need to replace /passive for /qn.
MS: Windows Server 2003 Compute Cluster Edition Community Preview #4 Released!
Microsoft released today Windows Server 2003 Compute Cluster Edition Community Preview #4 Build 561.
http://www.microsoft.com/windowsserver2003/ccs/default.mspx
http://www.microsoft.com/windowsserver2003/ccs/default.mspx
Monday, April 03, 2006
CTX: MetaFrame Presentation Server 4.0 Migration
Citrix Presentation Server 4.0 Administrator's Guide
http://support.citrix.com/kb/entry.jspa?externalID=CTX106319&categoryID=619
Citrix Presentation Server 4.0 Migration Guide
http://support.citrix.com/kb/entry.jspa?externalID=CTX106832
http://support.citrix.com/kb/entry.jspa?externalID=CTX106319&categoryID=619
Citrix Presentation Server 4.0 Migration Guide
http://support.citrix.com/kb/entry.jspa?externalID=CTX106832
Sunday, April 02, 2006
CTX: Assessing the Local Host Cache
Verifiying Local Host Cache Integrity
Run DSMAINT VERIFYLHC command. To automatically recreate a corrupt local host cache, enable the VERIFYLHC /AUTOREPAIR option.
Refreshing a Corrupt Local Host Cache
Run DSMAINT REFRESHLHC command.
Recreating the Local Host Cache
Run QFARM to verify that the data store server is available.
Type NET STOP IMASERVICE and type Y.
Backup the file IMALHC.MDB to another directory.
Type DSMAINT RECREATELHC
Type NET START IMASERVICE.
Run DSMAINT VERIFYLHC command. To automatically recreate a corrupt local host cache, enable the VERIFYLHC /AUTOREPAIR option.
Refreshing a Corrupt Local Host Cache
Run DSMAINT REFRESHLHC command.
Recreating the Local Host Cache
Run QFARM to verify that the data store server is available.
Type NET STOP IMASERVICE and type Y.
Backup the file IMALHC.MDB to another directory.
Type DSMAINT RECREATELHC
Type NET START IMASERVICE.
CTX: Troubleshooting the IMA Service and Data Store
IMA Service errors appear
- Data Store database server unavailable.
- Local Host cache corrupted.
- IMA Service not running.
Published applications unavailable in the ICA session
- Local Host cache and Data Store not synchronized.
- IMA Service not running.
Presentation Server Console is inaccessible or is unable to accept any changes made to the farm
- IMA Service not running.
- Data Store connectivity failure.
- Incorrect DSN configuration.
CTX: Citrix Technical Support Brief Troubleshooting Guide
CTX106727 - Citrix Technical Support Brief Troubleshooting Guide (PDF format)
http://support.citrix.com/kb/entry.jspa?externalID=CTX106727
http://citrix.musumeci.com.ar/Files/Troubleshooting_Guide_Sep%202005FINAL.PDF
http://support.citrix.com/kb/entry.jspa?externalID=CTX106727
http://citrix.musumeci.com.ar/Files/Troubleshooting_Guide_Sep%202005FINAL.PDF
CTX: Evaluating a Citrix Enterprise Environment
Citrix Methodology Process
- Define the issue.
- Gather detailed information.
- Consider possible causes.
- Create an action plan to address the issue.
- Implement the action plan.
- Observe the results of the plan.
- Document changes following issue resolution.
CTX: Default Ports For Client Connections
Default Ports that must be open for the Client connections (for WAN Connections)
1494 (TCP) - ICA Protocol
80 (TCP) - HTTP Browsing
2598 (TCP) - Session Reliability
1604 (UDP) - TCP Browsing
1494 (TCP) - ICA Protocol
80 (TCP) - HTTP Browsing
2598 (TCP) - Session Reliability
1604 (UDP) - TCP Browsing
Subscribe to:
Posts (Atom)